
Showing posts with label Terrain. Show all posts
Showing posts with label Terrain. Show all posts
Tuesday, November 6, 2012
A new terrain piece from Crisis
 Posted with Blogsy - (c) Rudy Boeynaems 2012
Wednesday, November 2, 2011
Table for the Crisis Demo


Here is the table set up for the Crisis Demo. Table size is 4" square. The terrain is simple, the scenario is as well, purpose is to show the different game mechanics, without getting bogged down in a scenario that is too big for an inexperienced player.
The forest tiles have woodland scenic trees on them, river tiles hand made, roads are strips of rubber, and everything else is scratchbuilt. I might pass by the model shop tomorrow for some more bling for the roads, I'm thinking a bit of track, some trees alongside the road, electricity poles, but that depends on the time left: Friday it's over to Crisis straight from work, Saturday morning we need to finish the set-up.
Thursday, May 5, 2011
Look at my bocage!

I finally managed to throw together a few strips of bocage for our Normandy campaign, and I have to say I’m pleased with them! Just a strip of plastic board, bit of hardfoam on top, sprayed army green, and used the hot glue gun to flock them using the wonderful thick flock from Woodlands!
Sunday, May 1, 2011
10 mm bridge
In order to complete the 3+ meters of river tiles I made, I started working on the special features: a bridge for a ground level macadam road, a bridge for a raised earth causeway, and a lock.

First step is making the two bridge sides, and make them equal. I went for a 7 mm height, to compendate for the unit bases.

A narrow strip of plastic to support the deck is glued in,

The deck is cut out too long, and then sandpapered to size so that the road to bridge transition is smooth.
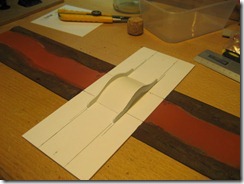
Penciling in the road and river boundaries. Using foam and card I build the river banks. Tomorrow I'm basecoating and brushing the earth tones mix on.


First step is making the two bridge sides, and make them equal. I went for a 7 mm height, to compendate for the unit bases.

A narrow strip of plastic to support the deck is glued in,

The deck is cut out too long, and then sandpapered to size so that the road to bridge transition is smooth.

Penciling in the road and river boundaries. Using foam and card I build the river banks. Tomorrow I'm basecoating and brushing the earth tones mix on.

Sunday, April 24, 2011
Set of 10 mm river tiles: phase 2

Saturday, April 23, 2011
Some Pendraken 10 mm ruined houses painted

Friday, April 22, 2011

Tuesday, April 19, 2011
WW2 10 mm Rubble etc. review
One of the things I brought home from Salute was a selection of 10 mm terrain items: mainly rubble, but also some walls, fences, and a few bridges. I got stuff from three different manufacturers: Pendraken, Time Cast and Field Works.
Thursday, March 10, 2011
Making a river set for 10 mm - phase 1
On the list of terrain I still have to prepare for playing SSOM is a good set of river tiles, including corners and so on. I cut up a few 100 x 250 mm sheets of pp, 2 mm thick, and started cutting 50 mm wide masking tape.
 I cut it in a wavey line, then glued the straight edges in the middle to get a natural flow while still keeping a 50 mm width. On both edges I indicated a 25 mm bank, in order to make sure the rivers fit together well.
 I made a total of 8 straight pieces, that's 2 meters of river, and some corners, 4 straight corners, and a ford.
 Using leftover strips of foam I made the rought bank shapes. After doing all the pieces I cleaned up the edges and made sure the banks more or less aligned. Not perfectly, but I managed to get rid of the biggest misses using an exacto and a big dollop of patience.
 I cut roughly and let the glue dry overnight before starting to refine the shapes: that way I avoided tearing off pieces of foam.
 I made up a bowl of home improvement plaster, and started smearing and sculpting. Quite a lot of plaster went into it, but I did manage to get all corner parts done, and partly finished the ford. With the plaster not yet completely dry, I start tearing off the masking tape.
 Apart from a few smudges, this makes for very nice edges. The smudges will probably remain, I might try to clean them up later, but it just adds a bit of irregularity.


Wednesday, February 23, 2011
Second attempt at making modular 10 mm WW2 houses


Wednesday, December 15, 2010
10 mm windows
I have acquired some windows from houses in HO scale that I have been using, and it kinda works, but I want to try and make my own. For this, I'll need a two part cast, and 10 mm windows are small! THe size I'm going for for a full size window is about 6x9 mm. That means the woodwork is made in 0,5 mm evergreen strips.
It took me the better part of an evening to finish one window, partially finish another (in another style) and finish one window frame, all of those without gap filling and sanding. On the plus side I have finally found a good use for my 5x magnifier glass.


It took me the better part of an evening to finish one window, partially finish another (in another style) and finish one window frame, all of those without gap filling and sanding. On the plus side I have finally found a good use for my 5x magnifier glass.


Not so brilliant mould

Saturday, December 4, 2010
Some terrain impressions
This is far from final, just an impression of how the terrain - homemade and from a variety of suppliers - is coming along. I definitely need bases for the houses, with hedges and grass on them, to get a realistic impression for houses with gardens. I also need a system that keeps the roads in place better, I hate it when they are not flat on the table.


Thursday, December 2, 2010
First 10 mm building casting attempt
Given the limited choice in 10 mm WW2 buildings and the poor coherence between different suppliers' models I decided to try and cast my own. This means build the original. make a cast, and cast different units. Of course, I want some variety. I decided to go ahead and attempt a row house front first.
 I started out by making a complete 10 mm two store building in Normandy style. That was my first mistake. I had to rip it off of the plastic board, and the glued construction is far from stable, considering you need to exert some serious pressure to get your detail in there. The second mistake is the use of architect board. Way too soft, impossible to smooth before casting, so you have a lot of cleaning up to do afterwards.
 I tried to make the edges are clean as possible, added a little frame for the door, and then started mixing the silicone paste. This is a putty version, that goes very soft when mixed together, and is really easy to blend. The detail is superb. That was the first problem with the mould. I cut out the holes for the windows without taking into account the depth. Some of the shutters are not perfectly against the wall. Not a problem for a one off, but a big issue for a mould: putty creeps between every nook and messes up the finer details.
 Another issue: the edges. You really need a box to push your putty and original into. I grabbed a bit of flat board just to make sure I have a straight bottom on my mould, but that's only 50% of the story. First impression the mould looks great, but on closer inspection there are a lot of areas where the putty crept into small crevisses. I tried to repair this but obviously this wasn't easy.
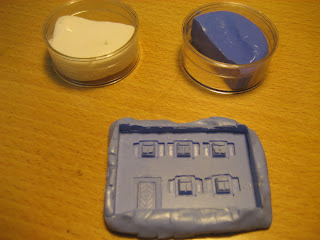
Nevertheless I cast a row house front in my new mould, and the result was not too bad. For row houses, you just need fronts and rears, the rest can be architect board. If you zoom in you'll see the zones where I had to perform repairs, some missing detail, and some bubbles (I forgot to take care of these) but it is also clear that if you have a good original, the mould can be amazing. I'm gonna paint this one anyhow just to see how it looks.
 So from here, the next step is making some clean originals. I am thinking about making parts that are multi-use, like two windows, a window and a door, a shop window, three windows, so that I can assemble houses with little effort. In order to have clean edges, I'm gonna look for 3 mm thick plastic board. You can get a perfect edge on those, they can be sanded, scratched into, and so on. Alternatively, I could use 2 mm board and put a nice flat layer of white milliput on it, so that I can sculpt in brick details and textures. That should keep me busy for a week or two.


Nevertheless I cast a row house front in my new mould, and the result was not too bad. For row houses, you just need fronts and rears, the rest can be architect board. If you zoom in you'll see the zones where I had to perform repairs, some missing detail, and some bubbles (I forgot to take care of these) but it is also clear that if you have a good original, the mould can be amazing. I'm gonna paint this one anyhow just to see how it looks.

Thursday, November 4, 2010
10 mm WW II Terrain: French country house and factory
Here's another piece of terrain ready: I acquired a bag full of railroad leftover bits and incomplete kits, and I scrounged some of the bits in order to make houses in an appropriate scale, with decent detail. For some reason, the pictures didn't perfectly focus, but I'll be buggered if I descend the stairs into the cold again now that I'm sitting here warm and cosy...


Wednesday, October 27, 2010
Some concept art for terrain
I'm always struggling with windows in 10 mm scale, so in order to have some guideline as to how the finished item should look, I did some research and drew a series of typical 40ies windows from Normandy, Belgium, and Germany.

I'm also working on some main terrain features to give a game table that je ne sais quoi feel. Here are the initial drawings of a church I am planning to make. AT the moment I think I am going to manufacture the main structure out of foam board. We'll see where it goes from there.


I'm also working on some main terrain features to give a game table that je ne sais quoi feel. Here are the initial drawings of a church I am planning to make. AT the moment I think I am going to manufacture the main structure out of foam board. We'll see where it goes from there.


Tuesday, October 26, 2010
First Post! 10 mm bridgehead


Subscribe to:
Posts (Atom)